Enter Cashflow Transactions
On the page, you can enter your cashflow funds information. You can also view the parameters selected for your cashflow. To edit your previously selected cashflow parameters, click the link. 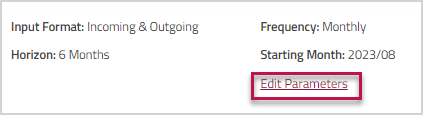
-
On clicking the link, you'll be redirected to Create Cashflow. The previously selected parameters are auto-populated in the fields.
-
You can modify the cashflow name and add new currencies to the existing cashflow.
-
Make the required changes, and click SAVE CHANGES.
Note:
-
You cannot edit parameters for cashflows that have already been completed. The link will not be displayed for completed cashflows.
-
If you click the link before entering information in the cashflow tables, your changes will be applied without a warning. However, if you click the link after you have entered information in the cashflow tables, a confirmation dialog will appear to warn you that any unsaved information will be lost and it cannot be recovered. Click YES in the confirmation dialog to edit the cashflow parameters. Click to exit the dialog and continue entering the cashflow information.
-
If you click the link when editing an incomplete cashflow and make changes to the , , , the or if you remove a a confirmation dialog will appear to confirm the changes. Click YES in the confirmation dialog to apply the changes. Click to exit the page without saving any changes. If you apply new changes, the existing cashflow information will be removed and it cannot be recovered.
-
The currencies that you selected are displayed as tabs at the top of the cashflow table (in the order of your selection). For example, if you first selected EUR and then USD, the EUR tab will be displayed before the USD tab in all subsequent reports. Under each currency tab, the current exchange rate![]() The rate at which one currency will be exchanged for another currency. for that currency against the base currency
The rate at which one currency will be exchanged for another currency. for that currency against the base currency![]() Usually refers to the domestic or home currency. In a currency pair, this is the first currency quoted. is displayed. You can either proceed with the system spot rate or you can enter your preferred budget rate. To enter your budget rate, click next to the field.
Usually refers to the domestic or home currency. In a currency pair, this is the first currency quoted. is displayed. You can either proceed with the system spot rate or you can enter your preferred budget rate. To enter your budget rate, click next to the field. 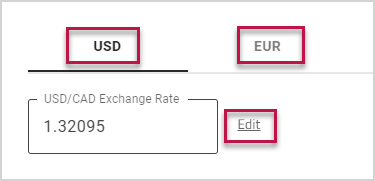
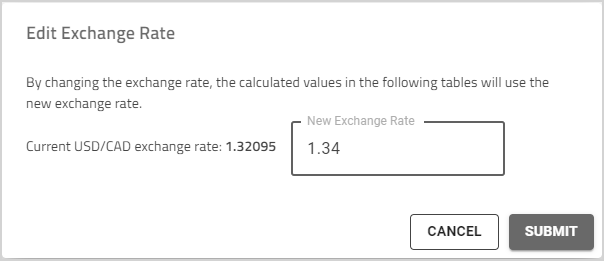
In the dialog, the current exchange rate![]() The rate at which one currency will be exchanged for another currency. against your base currency
The rate at which one currency will be exchanged for another currency. against your base currency![]() Usually refers to the domestic or home currency. In a currency pair, this is the first currency quoted. is displayed.
Usually refers to the domestic or home currency. In a currency pair, this is the first currency quoted. is displayed.
-
In the field, enter your budget rate and click .
-
To close the dialog without saving any changes, click or click outside the dialog.
-
On successful save, the last updated date and a message are displayed to let you know that the rate has been manually overridden. You can edit this rate as necessary to ensure accurate cashflow analysis.

Important: The updated exchange rate will apply to the current calculated values in your cashflow tables and you will lose all previous values. If you wish to revert to the previous exchange rate, you will have to enter it manually. You can find the previous exchange rate in the dialog.
Note:
-
If the exchange rate is modified, the system will not automatically refresh the edited rate to match the current spot rate when you reopen the cashflow for editing or viewing the .
-
You can update the exchange rate multiple times.
-
You cannot increase or decrease the exchange rate by more than 10% of the current value.
-
You can enter a valid positive numeric value, including decimals. You cannot enter negative, zero, alphanumeric, or scientific notations. The button is disabled in case of an invalid entry.
-
When entering a valid numeric value, the system will automatically round the new value to the nearest 5 decimal places if it is greater than 1, and round it to 6 decimal places if it is less than 1.
Enter transactions
Cashflow tables are displayed on this page based on the selected input format.
The and tables are displayed if the selected is . Each currency will correspond to its own cashflow table. In the table, you can enter your future incoming/outgoing transactions in the respective foreign currency tab. Depending on the selected , a column is included for each month or week.
Tip: Click once in the data fields to enter information or double-click to edit.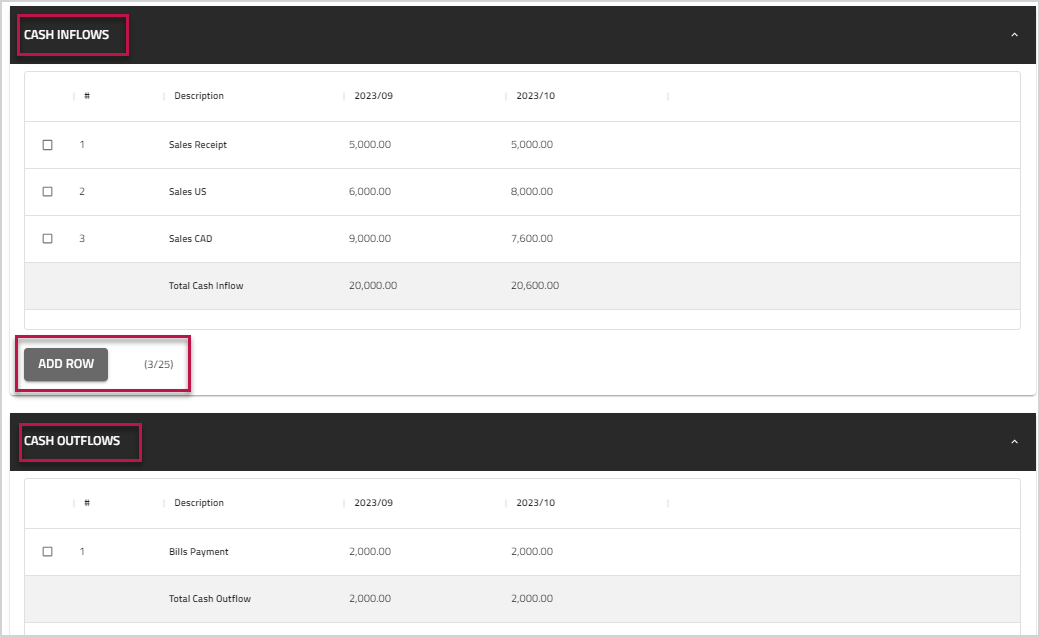
-
In the cashflow tables, enter a Description and the Value for the selected Horizon.
-
By default, one row is added to the table. To add additional rows, click .
You can add a maximum of 25 rows to the table. The count of the rows added to the table is displayed at the bottom of the table. For example, (5/25) means that 5 rows are added and you can add up to 20 additional rows. After you have added 25 rows (25/25), the button is disabled and an information icon is displayed. You can hover your mouse over the icon to see a message indicating that you have reached the maximum number of allowed rows.
 -
To remove a row, select the row and click . Click to cancel the selection.
You can select multiple rows for deletion, the count of the rows selected for deletion is displayed in the button, for example, . Click in the confirmation dialog to delete the selected rows. -
The sum of the entered funds is displayed in the Total Cash Inflow/Outflow row.
The table is displayed if the selected is . Each currency will correspond to its own cashflow table. In this table, you can enter the net value of your cashflow transactions in the respective foreign currency tab. Depending on the selected , a column is included for each month or week.
Tip: Click once in the data fields to enter information or double-click to edit. 
In the cashflow table, enter a Description and the total net value of the funds for the selected Horizon.
Note: Due to the inclusion of the net amount, the option to add/remove rows and the Total row is excluded from this table.
To view a comprehensive FX risk analysis, it is recommended that you enter any hedges booked outside of Corpay in the table. Each currency will correspond to its own table. Depending on the selected , a column is included for each month or week. You can hover your mouse over the information icon to view an explanation of the data to enter.
Tip: Click once in the data fields to enter information or double-click to edit. 
-
Enter the amount of any hedges you booked outside of Corpay.
-
If you have booked multiple Non-Corpay hedges, enter the sum of the hedges for the selected Horizon.
Note: Due to the inclusion of the net hedge amount, the option to add/remove rows and the Total row is excluded from this table.
After you enter all the information in the tables, click to review the entered information.
: Your inputs are not auto-saved by the system. It is highly recommended to save your data periodically to prevent loss of your work.
Proceed to the section Review Summary.
Note: Client represents and warrants that they are only inputting data they have the right to process. Client acknowledges that they are solely responsible for the quality, reliability, and accuracy of all data they enter, as well as any reports generated from that data.